

Animated view in your app can make the interface more interactive. Adding a motion-oriented element rather than a stationary element can increase the UX of your app. On this note, selecting the React Native framework can help you add such an interesting object with a lesser effort. Let’s see how.
Before getting into the code snippets we need to cover some theoretical concepts on the Animated API of React Native.
Why is it important to add animated views in an app?
It is all about improving the user experience of your app. Animation that I am talking about works on the concept of physics (inertia motion). If you already know about the idea of momentum, you may be familiar with the concept of objects in motion and how they behave if motion objects are brought to rest. This concept is quite interesting. Right?
However, since we are focused on adding an animated view in our app, there is no need to drag the theoretical concept.
Understanding the Animated library in React Native
The Animated Library is a form of the library where you can find different components, objects, and props useful for creating an interactive animated view. This is one of the most prominent reasons to choose the RN framework as the app development framework. You don’t have to create components every time you add a feature to your app, you can take the components from libraries like the Animated library for specific needs.
For the current project, you need to import Animated components for your React Native app development company.
What needs to be considered while using the Animated Library in your project?
The foremost thing that you have to consider while using components from the animated library is what type of animated view you want to create for your project. If you want to add uniqueness to your interface, you can build your animated components using Animated.createAnimatedComponent(). However, you can also use the following component types.
- Animated.View
- Animated.Text
- Animated.Image
- Animated.SectionList
- Animated.ScrollView
- Animated.FlatList
You will see the use of Animated.View later in this tutorial.
Consideration of Animated.Value XY rather than Animated.Value
Since we are focused on adding the 2D animated view, we will be using Animated.ValueXY. ValueXY and Value, both are the properties of the Animated components. We use these properties to render animations.
Configuring Animation using Animated.spring()
This section is about what type of animation you choose for your app. It can be a fade-in/ fade-out view, a spring view with a bouncing ball, and others. On this note, you can go with either of the types mentioned below.
- Animated.timing()
- Animated.spring()
- Animated.decay()
Since you will use Animated.spring() for this project, the parameters that you need to ponder on are as follows.
- useNativeDriver
- Bounciness
- Delay
We will learn the use of these parameters later in the section of the codebase.
Prior-needed knowledge
If you have not set up the Environment for the framework, you cannot build any React Native project. However, if you have already set it up, you can skip this step and learn to build the template for your project.
If you want to set up the environment for the React Native framework, you need to download software such as node.js, Android Studio, and other SDKs.
Once you are done with the setup process, you have to build a file or a template. To build this, run the command npx react-native init Animation_Project –version 0.68.1. Note that ‘Animation_Project’ mentioned in this command is the name of the template. This is the place where you will embed the codebase and create an animated view.
Framing the code syntax for the project
You have to design the codebase in the App.js file.

Image 1
Introduce all the React Native components that you may need for the project. Here, I have imported StyleSheet, View, Text, and Animated. Also, you have to import the useEffect hook from the react library.
The most important component is the Animated. This has helped you to wrap the project in a compressed manner.
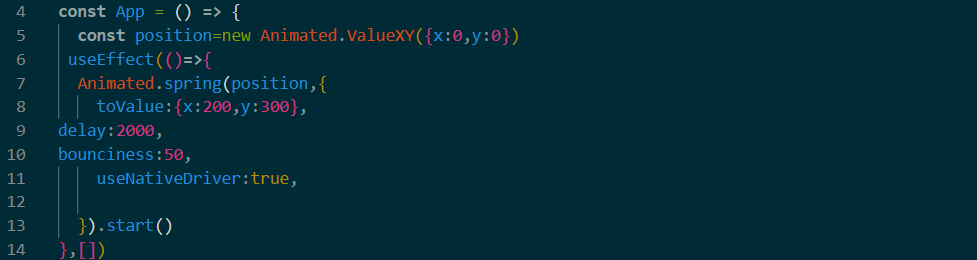
Image 2
The code introduces an Animated.ValueXY object with 0 as the value of x and y.
The animation view uses a spring effect set on the animated value. Its x and y values are mentioned as 200 and 300 respectively.
The code also specifies that the animation is bouncy, with a delay of 2000 milliseconds, and uses the native driver for a smooth performance.
.start() is a method that is used to initiate the animation effect.
Also, there is an empty array in the 14th line of image 2. It directs the useEffect() function to run only if the component is mounted.
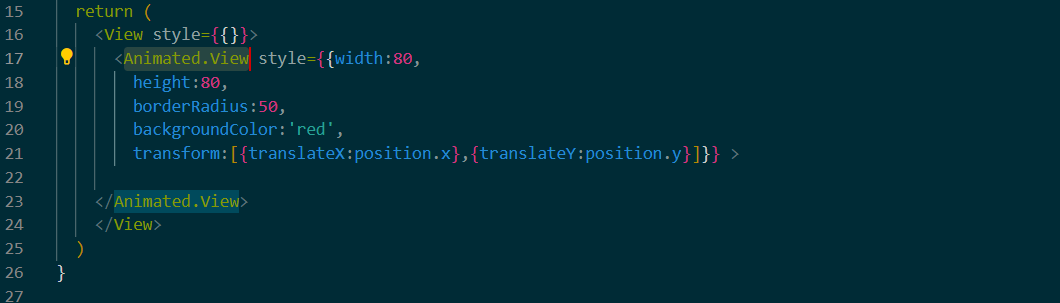
Image 3
The code syntax mentioned in image 3 is a view element designed using the Animated.view. It has a red background and is 50px wide, and 80px is its height. The border-radius is set as 50px.
The transform is a property used in CSS. It is used to provide motion to elements.

Image 4
This is the last segment of the codebase where you have to use the export statement and the StyleSheet components. The export statement is necessary for every file you create.
Note that I have just mentioned the StyleSheet components but did not use them.
How to present the app on a device?
Yes, this is an important section for projects. Testing an app on any device will prove your efficiency as a developer.
So, how can you complete this task? Don’t worry I have got you covered. Just follow the below-given steps.
- Run the cmd from the template you created in the previous step.
- Two commands: npm install and npx react-native run-android are important for every RN project you build.
- Run these two commands on the cmd and wait for your emulator to start on the system.
Refer to image 5 for the project’s output.
Image 5

Author Bio:- I am Neha Sharma working as a technical content writer with 4 Way Technologies. I am passionate about reading and writing content for Web application development, mobile application development, SMART TV app development, and DevOps. I am also fond of creating applications (small) using the latest Javascript library. I am having close to 5years of experience in a blogger avatar. You can reach out to me to discuss emerging technology trends and their impact.